Resolving High CPU Usage Caused by Windows Modules Installer Worker in Windows 10
Is your Windows 10 computer suddenly acting sluggish? Perhaps you’ve noticed your CPU usage soaring, and upon investigating, you find “Windows Modules Installer Worker” consuming an excessive amount of resources. This can be frustrating, but fear not, as we have the solutions you need to get your PC back to optimal performance.
Understanding Windows Modules Installer Worker
The “Windows Modules Installer Worker” is a vital component of your PC. Its primary role is to automatically check for and install Windows updates, ensuring your system remains secure and up-to-date. This process runs quietly in the background, but it can become a nuisance when it starts hogging your CPU resources.
Is Windows Modules Installer Worker a Threat?
Before we dive into solutions, let’s address a common concern: Is Windows Modules Installer Worker malware? The answer is no; it’s not malware. It’s an integral part of Windows Updates. However, if you’re still worried, you can run a thorough virus scan using your preferred antivirus software or Windows Defender.
Why Does Windows Modules Installer Worker Cause High CPU Usage?
The culprit behind the high CPU usage is often the Windows Modules Installer Worker’s relentless quest for updates. Ideally, updates should install during idle hours, but if your PC is off during these times, it will download and install updates when your system is active. Additionally, this issue can arise due to insufficient RAM or outdated drivers, especially during manual update searches.
Can You Disable Windows Modules Installer Worker?
While some may recommend disabling the Windows Modules Installer Worker, we strongly advise against it. Disabling it interferes with critical Windows updates, leaving your system vulnerable to security threats. Keeping your Windows OS up-to-date is crucial for your computer’s safety.
Effective Solutions to Fix High CPU Usage by Windows Modules Installer Worker
Let’s explore several methods to resolve this issue:
Method 1: Remove the SoftwareDistribution Folder
- Open the Run utility by pressing Windows + R.
- Type “services.msc” and click OK.

- Locate “Windows Update,” right-click it, and select “Pause/Stop.”
- Use File Explorer to navigate to C:\Windows.
- Right-click the “SoftwareDistribution” folder and delete it.
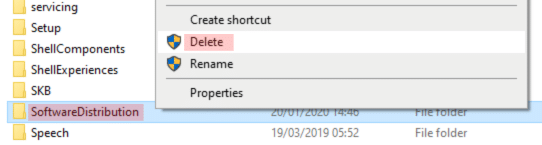
- Restart your device to see if the issue is resolved.
Method 2: Restart the Windows Update Service
- Open the Run utility by pressing Windows + R.
- Type “services.msc” and click OK.
- Find “Windows Update,” right-click it, and select “Stop.”
- Wait for 30 seconds.
- Right-click “Windows Update” again and choose “Start.”
Method 3: Run the System File Checker (SFC Scan)
- Open the Run utility by pressing Windows + R.
- Type “cmd” and press Ctrl + Shift + Enter.
- If prompted, click Yes to allow Command Prompt to make changes.
- In Command Prompt, type “sfc /scannow” and press Enter.
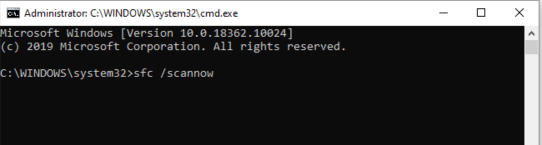
- Wait for the scan to complete and restart your device.
Method 4: Use the DISM Command
- Open the Run utility by pressing Windows + R.
- Type “cmd” and press Ctrl + Shift + Enter.
- If prompted, click Yes to allow Command Prompt to make changes.
- In Command Prompt, type the following commands and press Enter after each:
- “DISM.exe /Online /Cleanup-image /Scanhealth”
- “DISM.exe /Online /Cleanup-image /Restorehealth”
- Wait for the process to finish and restart your device.
Method 5: Turn off Automatic Updates for Windows 10
- Open Settings (Windows + I).
- Click Update & Security.
- Select Windows Update.
- Click Advanced Options.
- Pause updates for your desired duration.
- Remember to revisit this setting periodically.
Method 6: Adjust Your Internet Settings
For Wi-Fi Connection:
- Open Settings (Windows + I).
- Click Network and Internet.
- Select your Wi-Fi network.
- Set it as a metered connection.
For Ethernet Connection:
- Open the Run utility (Windows + R).
- Type “regedit” and click OK.
- Navigate to HKEY_LOCAL_MACHINE → SOFTWARE → Microsoft → Windows NT → CurrentVersion → NetworkList → DefaultMediaCost.
- Right-click DefaultMediaCost, select Permissions, and add your username.
- Allow Full Control for your username.
- Double-click Ethernet in DefaultMediaCost and set Data to 2.
- Restart your computer.
By following these methods, you can resolve the Windows Modules Installer Worker high CPU usage issue and enjoy a smoother Windows 10 experience. Remember, keeping your system up-to-date is essential for both security and optimal performance.
One More Thing
If you’re in search of a software company that embodies integrity and upholds honest business practices, your quest ends here at All Good Keys. As a Microsoft Certified Partner, we prioritize the trust and satisfaction of our customers. Our commitment to delivering reliable software products is unwavering, and our dedication to your experience extends far beyond the point of sale. At All Good Keys, we provide a comprehensive 360-degree support system that accompanies you throughout your software journey. Your trust is our foundation, and we’re here to ensure that every interaction with us is a positive and trustworthy one.
More Articles
- What is Werfault.exe and How to Fix It on Windows 10?
- Resolving the “Windows Resource Protection Could Not Perform the Requested Operation” Error
- How to Restore Your Windows Key and Supercharge Your Workflow on Windows 10/11
Stay Connected with All Good Keys
We hope this Blog/Article has been helpful . However, if you still have questions or concerns, our team of experts is always available to assist you. Contact us through email, live chat, or phone, and we’ll be happy to help you out.
Don’t miss out on our latest blog posts, promotions, and discounts. Subscribe to our newsletter for early access to exclusive content and the best deals on all products available at AllGoodKeys. For more tech-related articles, check out our blog page, which is updated regularly with fresh content. Thank you for choosing AllGoodKeys!